- Tuesday 31 August 2021
- 0 Comments
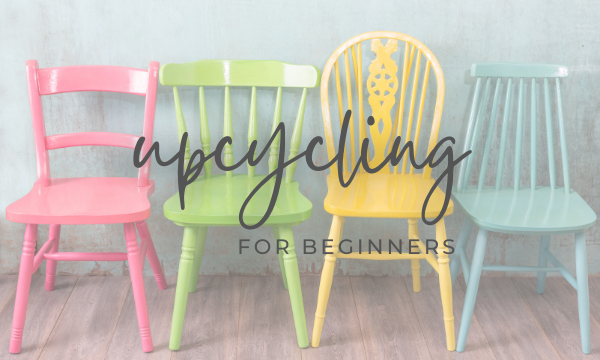
12 Ingenious DIY Upcycle Ideas for Beginners. Feel Good, Eco-Friendly, Home Decor Starts Here!
Are you moving into a new home on a budget or are you just tired of that wheel of consumption that’s been putting our planet in danger? Upcycling what you already have helps you save the planet AND your money.
The recent UN IPCC report on climate change has made us all feel the urgency to reduce our carbon footprint. Eco Conscious homewares are a great place to start! Ready to check out these slow home-decor ideas?
So we scoured Instagram to get you some visual interiors upcycling ideas to help you re-ignite your creative juices below and reuse, recycle and renovate more of what you do have.
Creative Patterns + Fresh Accessories + Paint = Easy Furniture Makeovers!
What’s the simplest way to begin your upcycling adventure?
Repaint of course? Start with (non-antique) old wooden furniture you may have found in your granny’s attic or neighbourhood skip. Maybe you’ve acquired a flea market/car boot sale/charity shop find and want to pimp it up a bit?
But first things first...
Prep The Furniture Pieces Before You Begin!
Erin Spain’s HOW TO PAINT FURNITURE: A BEGINNER’S GUIDE is a good place to start . Here are some of the main points to remember if working with Wooden furniture.
- - Clean the old piece by first removing movable parts like drawers and using Wooden Furniture Oil Soap if you can. Make sure the end result is dry and dust free.
- - Give it a Sanding to remove any old gloss paint that may already be there. If the surface is free from gloss paint already, just skip this step.
- - Put on some Primer to cover any stains or discolorations in the wood.
- - NB: Use Fine-Grit Sandpaper to lightly sand between EVERY coat of paint for an even finish. Remove the sanding dust each time ideally with tack cloth.
- - Use Satin finish or Gloss paint like an interior latex paint to avoid a flat finish.
- - A Paint Sprayer or small roller (try Two Fussy Blokes rollers) gives it a more even finish as well. You don’t want the appearance of brush strokes on your finished product.
- - Post-painting, ensure you let it Dry 24 hours.
- - Seal It with a top coat or finishing wax. Alternatively just leave it alone and let it cure for about 30 days.
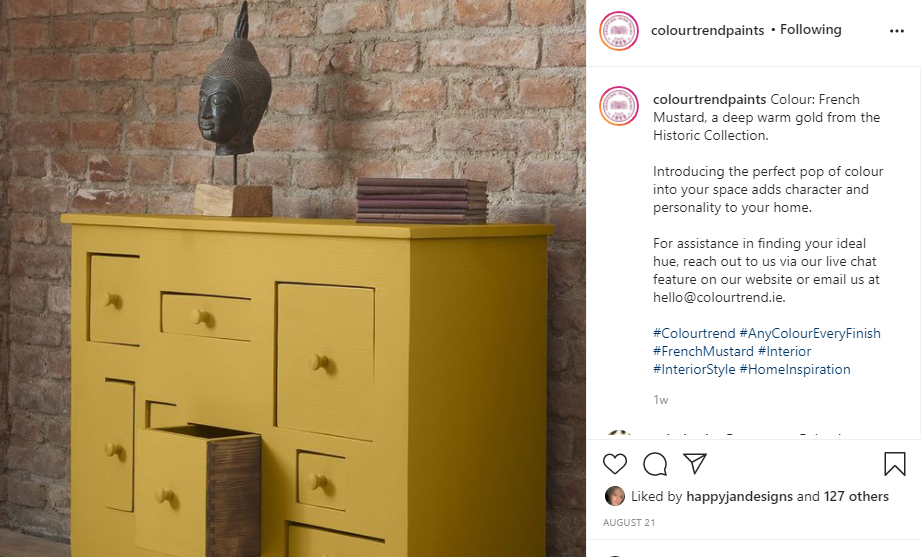
Option 1 - All Over Paint Job
You could start with refreshing your new piece with an all over paint job that ties in with your new home decor palette. Or use the piece to create a quirky accent with a bright splash of colour.
This is a perfect way for customizing a very basic Ikea or old flatpack piece into a showstopper that reeks of personality.
Check out this great example from the Colourtrend instagram account
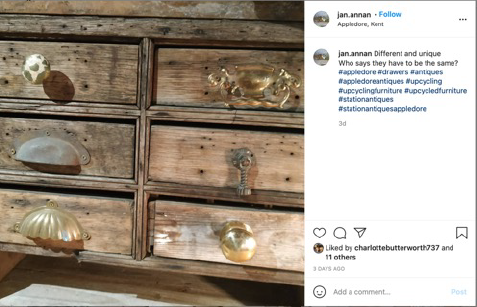
Option 2 - Refresh With New Knobs & Handles
A simple all-over colour can be taken further by changing the knobs and handles. Add a modern look with a more contemporary range of minimalist handles or unleash a bohemian look with embellish ceramic or glass knobs sourced from your latest flea market finds. Check out the range of drawer handles and knobs in our Bandon and Kinsale stores.
Be sure to remove the old fittings before your paint makeover so you don't have to paint around them and damage them in the process.
Take a look at this eclectic approach to having unique handles for every drawer at jan.annan instagram account
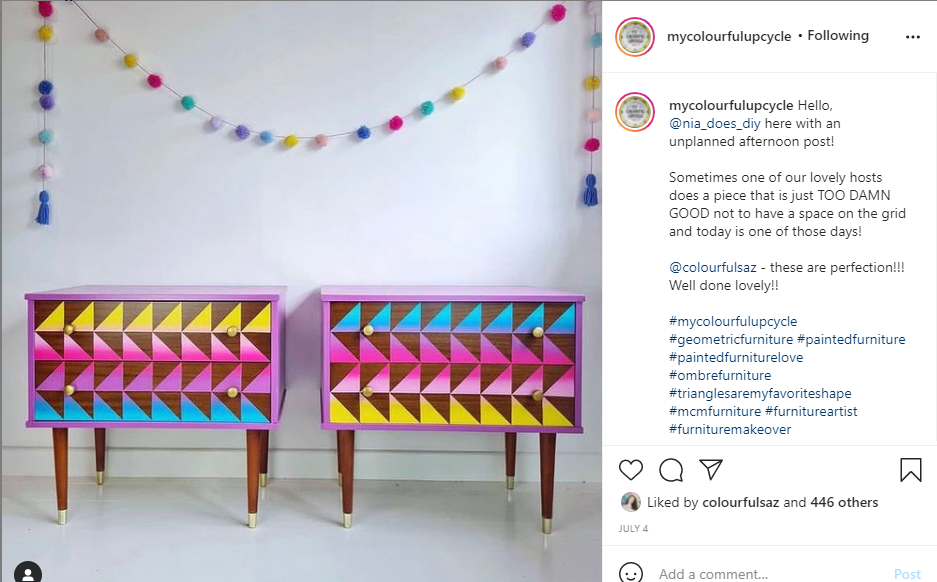
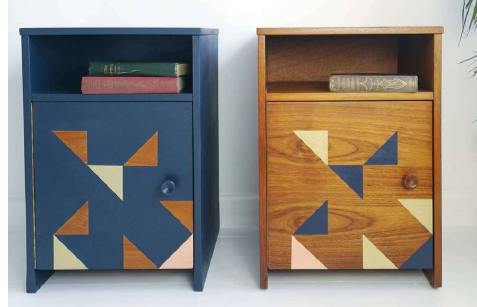
Option 3 - Modular Approach
Paint contrasting colours on the horizontal surfaces like drawers or panel doors to give your refurbished furniture a more dramatic effect.
Sharp technicolour contrasts lend a geometric contemporary look or use soft pastels to give it a graded look.
Option 4 - Colour in Stripes
Feeling braver and more confident? Love to inject some patterns into your interiors?
Use masking tape to mark out stripes and panels to colour in. Use as many colours as you want and vary the strip width for a more contemporary Paul Smith effect. Make them diagonal if you’re bored with right angles!
This can work well in rejuvenating the surface or an incidental nest of tables or old coffee table where the design feature really makes an impact.
Move on from stripes and go for more interesting angles - use your masking tape like you did in art class back in the school and create a stained glass effect by filling in the gaps in an array of colours.
Check these accounts for some amazing ideas - mycolourfulupcycle and colourfulsaz and nina_does_diy
Option 5 - Stencil It or go Full Graffiti Artist
Stencilling is a great way to apply patterns with the risk of drawing with your free hand.
You can purchase stencils or make them yourself using hard cardboard and a scalpel. Find a pattern you like, print it to scale or trace it on the cardboard and cut out the negative spaces with your scalpel.
A little paint spray or airbrush is the best mode of application.
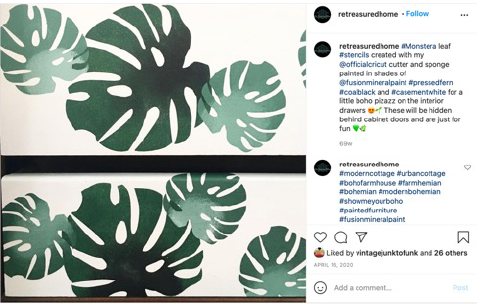
If feeling cautious start out with contemporary geometric patterns like these sideboards.
Alternatively follow a more Moorish style with more floral motifs or repeat for a tiled effect.
The Retreasuredhome account has a simple yet beautiful Monstera leaf pattern:
Feeling braver still? Find your inner banksy and stencil out full blown illustrations.
Need to get more dramatic? Go all Jackson Pollock on your furniture - spray, sprinkle and splash paint to your hearts delight.
Option 6 - Full Pattern illustration Makeovers
Are you good at drawing? Trace out your desired pattern across your base colour and paint in with a fine brush.
Take a look at jawfurniture’s account for some amazing illustrations

Surface Detail! Clad It In Something New
It’s not all about paint you know… Consider working with old furniture surfaces by cladding them in other materials. Tack fabric, glue on wallpaper or stretch-on some cast off lino on smaller pieces especially old industrial chairs.
A stapler gun could take you places!
Option 7 - Reclad Old Chairs with Off-Cuts
Turn a batch of boring old metal or wooden chairs into something eclectic, exciting and personalised. Perfect for garden parties outside on the patio.
Stretch over cast offs and off cuts in any patterned water resistant material that will take repeated wear.
Here’s some inspiration from pepinofactory account on Instagram

Mirror Mirror - Not Just on the Wall
Have you an old mirror not fit for use because of its pockmarked and distressed glass?
If it has an old ornate frame - just repaint it or sand it down for a distressed look depending on your tastes.
Option 8 - Turn Old Mirrors into Tabletops
There’s more than one way to do this.
Secure it to the top of an existing yet damaged old table or source ready-made legs on Amazon. There are some nice leg fixtures out there ranging from black steel legs to brass finishes. Alternatively try your hand at making new table legs.
Option 9 - Turn Old Mirrors Into Table Centrepieces Or Candle holders
This is an old trick from many wedding venues or banqueting halls. (Assuming it's not too large and can fit your dining table).
You can place a selection of chunky candles on its mirrored surface and trim them with foliage from your garden for a glamourous table centrepiece that reflects the candle light too!
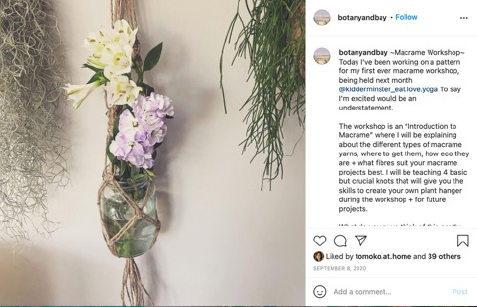
Old Glass Jars Are The New Hipster Must-Have
Option 10 - From Jars To Garden Accessory
No need for the bottle bank.
It’s the simplest upcycle and a favourite of the hipsters so much so that we’ve seen them in the restaurants! Turn your more old glass jars into candle lanterns for hanging or setting on outdoor dinner tables.
Use simple bendable metallic wire to suspend them outdoors.
You may also add some colour, with ribbon or create patterns with acrylic paint to cast even prettier shadows!
If you are handy with macrame you could turn the glass jars into perfect hanging pots for your bathroom or bedroom like in this @botanyandbay account.
Interested in outsourcing your Glass upcycling?
Check out Glint Glass Studio in Dublin for the many ways they’ve turned old Glass bottles into drinking Tumblers, Vases, Salt pigs and many more homewares items. They even give workshops so you can learn how to do it yourself or you could commission a piece with your empty bottle haul.
Done Painting? Upcycle the Paint Can!
When you’re done and dusted with the paint - there’s a way to go full zero waste with this DIY project. Empty paint cans be stripped of their branding, cleaned with some turpentine and recycled into an array of things
Option 11 - Candle Lamps
Poke or cut out tiny patterned holes into them and paint the outside. Their handles make them the perfect hurricane lamp or outdoor candle holders for garden parties - you could hang them on tree branches outside during those late night BBQs!
Option 12 - Plant Pots or Utensil holders
Cover them in fabric or clad them in wall paper to create little plant pots or utensil/pen holders .
Inspiration from the professionals
If you have zero time and headspace to do it yourself, why not #lookforlocal craft and design businesses that are creating more sustainable purchases for your home.
Here’s a great Irish Times article - “Meet the Irish designers turning old things into new gems”, including this Irish furniture artist alteredandeclectic and agness_vintage_redesigns
Also check out Irish company butleranddunne who are the Irish distributors of twofussyblokes - both accounts share many great examples of furniture painting using the fantastic range of Two Fussy Blokes paint rollers
Just remember …
What really matters is that you work the piece into your existing interior design aesthetic and colour palette.
Why not save the more colorful projects for the nursery and the kid’s rooms where you can afford to loosen up, start pattern mixing and get whimsical!?
And don’t forget it’s just paint! If things go wrong, paint over and start again - it's not the end of the world!
Shopping list
For prepping furniture before repainting
- - Scalpel & Hard Cardboard for Stencils / Stencils
- - Sugar Soap
- - Medium Grit Sandpaper
- - Fine Grit Sandpaper
- - Primer
- - Tack Cloth
- - Paint
- - Paintbrush
- - Foam Roller
- - Paint Sprayer (Optional)
- - Topcoat (MinwaxPolycrylic and Finishing Wax or Minwax Satin Wipe-On Poly for stained pieces.)
- - Semi gloss furniture paint
- - Staple gun
- - Old cut offs : wall paper, linoleum or Water resistant fabric
- - Flexible Metallic wire
- - Acrylic paint and small paint brushes
Stop by our Painting & Decorating sections to catch an overview of the supplies and brands available
Tell us how you did it!
What DIY steps did you take recently to upcycle your old furniture?
Why not tell us on Facebook and Instagram and share your handiwork.
Thanks to Homevalue Hardware for much of the content for this blog
